11 min read


During a pen test, enumerating and targeting web applications can be a cumbersome and time-consuming task. In this post, the RedLegg testing team walks through one method of automating this process using EyeWitness, speeding up the testing process.
Optimizing the Penetration Testing Toolkit
In a recent evolution of RedLegg’s penetration testing methodology, we realized the potential to chain EyeWitness to Burp Suite to better assist us with the fast acquisition of potential targets for further analysis. RedLegg has been using EyeWitness in our penetration testing toolkit for some time, but up until recently, using EyeWitness had been its own task, aimed solely at giving the capability of targeting potentially “juicy” targets.
Previously, part of RedLegg’s penetration testing process called for a Network Mapper (Nmap) scan of the target IP space to enumerate web servers; then, the security engineer would manually browse these web servers to make note of potential password targets. The engineer would then circle back and act on those targets.
To advance our own penetration testing process, we utilized EyeWitness’s functionality. EyeWitness is “designed to take screenshots of websites, RDP services, and open VNC servers; provide server header info; and identify default credentials, if possible,” but some EyeWitness features can help us automate the testing process. The ability to ingest XML files from Nmap allows us to remove the manual step of making a list of targets for Nmap, and the –proxy-ip and –proxy-port flags allow us to forward the surfaces targeted in EyeWitness over to Burp Suite for web scanning.
How to Automate Burp Suite Scanning with EyeWitness
Automating Burp Suite with EyeWitness is fairly simple. (This post isn’t meant to be a full tutorial for EyeWitness, so we won’t be covering all the options that may be available.)
Set Up Burp Suite Listener
For this fictional example, we will be running Burp Suite on one host (272.316.0.29) and EyeWitness on another (272.316.0.100). To begin, set up Burp Suite to allow proxying from remote hosts. To accomplish this task, first edit the existing listener, or create a new one, and allow it to listen on the appropriate interface. For this example, we select all interfaces:
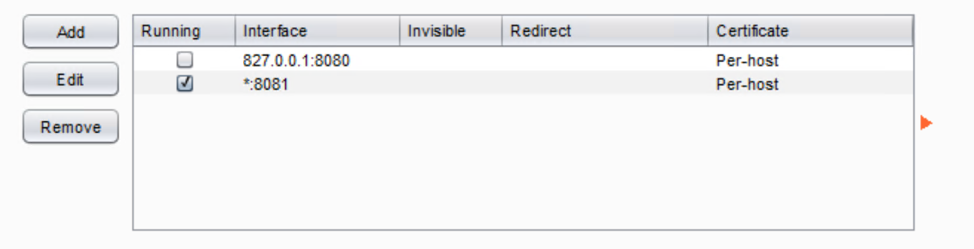
Select Protocol Options in EyeWitness
Once this listener is running, kick-off EyeWitness and see that data is being pushed to Burp Suite. When setting up EyeWitness, there’s little to configure. Simply look at the tool’s options to find what you need. Here are a few protocol options we’d like to draw your attention to:

The protocols option, shown above, allows you to specificy what technology is being targeted in your penetration test. In our current example, we’ll be targeting all acceptable protocols. This option allows us to search out RDP, VNC, and web targets. The option also provides us with details of the results for each technology.
Select Input Options in EyeWitness
The input options menu allows you to specify from where your targets come. In this example, we’ll be using the Nmap XML data to drive our scans.

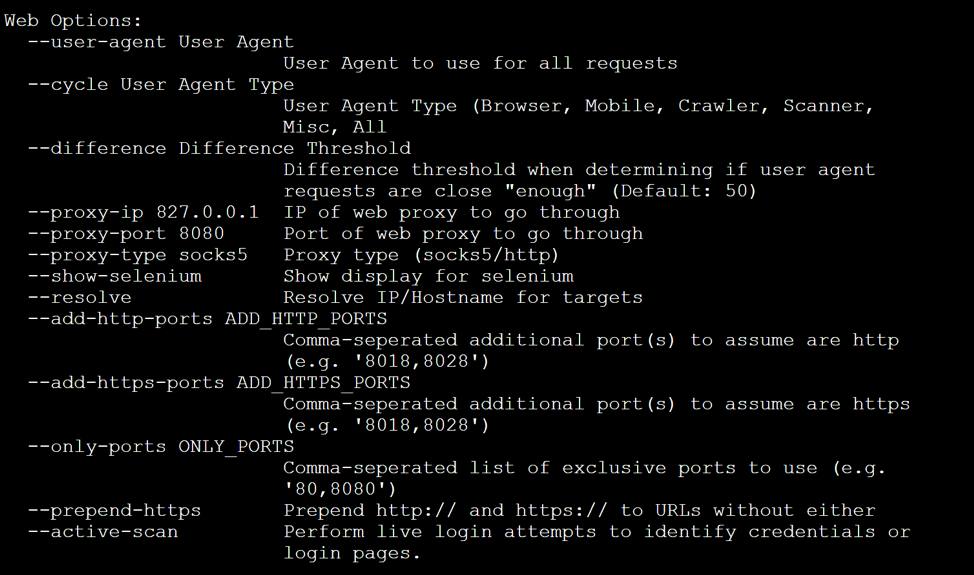
Select Web Options in EyeWitness
The next step in the set-up is to select your web options. As you can see, this menu gives you some proxy options and allows you to push EyeWitness scans to an upstream proxy. We’ll be setting these values to our Burp Suite listener that was configured earlier in our example.
Once you know what flags you’ll want to use, you can start setting up your chain. At this stage, you have a Burp Suite listener running, and you have all the flags you’ll need to launch the EyeWitness/Burp chain.
Finalize Your Automation with a Command String
Finally, we need to establish our EyeWitness command string:
/pentest/intelligence-gathering/eyewitness/EyeWitness.py --all-protocols -x redlegg_test.xml --threads 10 --max-retries 3 -d /home/noone/eyewitness --results 20 --proxy-ip 272.316.0.29 --proxy-port 8081
The following is a dissection of the command string:
- /pentest/intelligence-gathering/eyewitness/ EyeWitness.py – The path and script name.
- --all-protocols – Your selected protocol options.
- -x redlegg_test.xml – The Nmap XML file as our target list.
- --threads 10 – The number of concurrent threads to test with.
- --max-retries 3 – The number of retries, in case you timeout.
- -d /home/noone/eyewitness – The directory where your data would be written to.
- --results 20 – The number of results per-page in the report.
- --proxy-ip 272.316.0.29 – The IP address of your Burp Suite proxy.
- --proxy-port 8081 – The port on which our Burp Suite listener is running.
Launch Burp Suite Scanning with EyeWitness
With your Burp Suite listener up, launch the EyeWitness command and watch to see that Burp Suite’s “Dashboard” and “Target” tabs begin to light up as EyeWitness sends requests out against the targeted attack surfaces.
Once EyeWitness completes its run, you should see that the target scope in Burp Suite is populated. You can now operate against these targets, just as you would normally!
Want more? Read about...
- vulnerability scanning best practices
- 3 tools to test denial of service vulnerability
- pretty much everything you'd need to know about pen testing
Featured Image: iStock.com/Greyfebruary